Setting Up Our Podcast- The Audacity of It! Part 1
One of my weekly tasks relating to ministry is the editing and posting of our weekly sermon podcast. A lot of people have asked me how I do it, and a Twitter conversation yesterday inspired me to give it a quick write up.
Perhaps the greatest and most useful program ever written for anyone involved in any kind of sound manipulation is Audacity. Audacity is a cross-platform sound editor, built by a collection of volunteers around the world, and offered as open-source software. Audacity has ports for Windows, Linux, Mac and Unix, and it has many of the same features as expensive, commercial DAW programs.
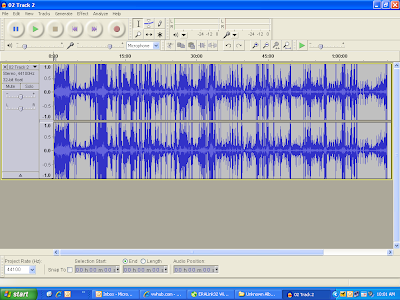
One of the best reasons for using a program like Audacity to edit a podcast is that it is a visual process as well as an audio one. Audacity, Ardour, GarageBand, ProTools and other programs translate the audio file into a visual display. With practice, the editor can spot potential issues just by looking at the waveform, without having to listen to the entire program. Below is an example of what the recording looks like in Audacity.
At Gospel Light, our sermons are recorded directly off the FOH soundboard onto a dedicated Sony CD recorder. The sound tech is responsible for watching the levels on the recorder to minimize clipping. It is better for me as the editor for the recording level to be too low than too high. Clips represent lost data, that cannot be recovered.
I import the recording onto my computer using the "CD Rip" feature of Windows Media Player, but any ripping software will do. I rip the CD as a .wav file, so that there is no data loss. Once I have the .wav file, I import it into Audacity.
The first thing I do is look at the ends of the recording. Often our sound techs will start the recording before the actual sermon starts, or the speaker will converse with the audience about something unrelated to the sermon, and which may not make sense to a listener. I will listen to the beginning of the recording to find and appropriate place to cut in.
Audacity features an easy click and drag selection tool. What I do is set the marker at 1:00 and drag back to the beginning of the recording. This does two things. When "Play" is hit, it will play the selection. Also, by hitting "Ctrl+1", I can zoom in on the selection.
Once I locate the place to begin the podcast, I mark it with the cursor, drag to the beginning and press the "Cut" button. I do the same kind of trimming at the end. I listen to the last few minutes to find a good place to end. A lot of times there is music during the invitation, so I will cut after thirty seconds or so of music. This gives me a nice bumper for the end of the podcast. (More on that later.)
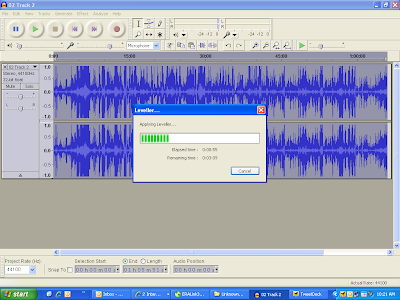
Once the ends are trimmed, I begin to look at the overall levels. Sometimes there are peaks visible that indicate there are areas of very high amplitude (volume) in the signal. If there are many of them, I apply the "Leveller" effect. Select Effects => Leveller. I generally find that "Moderate" is sufficient to accomplish what I want - to equalize some of the extreme high- and low-volume areas.
If there's not a lot of peaks, I will zoom in on them and selectively use the "Amplify" effect to lower them. To do this, I move the slider on the "Amplify" dialog to the left until it's about -3.8 or so. This has little discernable effect on volume. (And we'll fix it later, anyway!) The selection tool and "Ctrl+1" are useful in this process. ("Ctrl+F" zooms the file out to fit the window.)
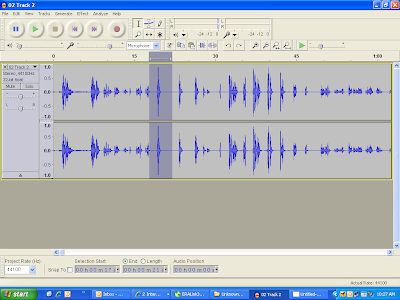
In the example above, you can also notice "flat lines" - areas where there are periods of silence. These may be fine in a live setting, but can get distracting when listening to audio. If I "see" a period of silence lasting more than five or six seconds, I often will trim it out. Also, sometimes the speaker engages in dialog with the audience. Since we use a wireless lavalier mic for the speaker, I would have to select and amplify that section to match the surrounding sections.
Perhaps the greatest and most useful program ever written for anyone involved in any kind of sound manipulation is Audacity. Audacity is a cross-platform sound editor, built by a collection of volunteers around the world, and offered as open-source software. Audacity has ports for Windows, Linux, Mac and Unix, and it has many of the same features as expensive, commercial DAW programs.
One of the best reasons for using a program like Audacity to edit a podcast is that it is a visual process as well as an audio one. Audacity, Ardour, GarageBand, ProTools and other programs translate the audio file into a visual display. With practice, the editor can spot potential issues just by looking at the waveform, without having to listen to the entire program. Below is an example of what the recording looks like in Audacity.
At Gospel Light, our sermons are recorded directly off the FOH soundboard onto a dedicated Sony CD recorder. The sound tech is responsible for watching the levels on the recorder to minimize clipping. It is better for me as the editor for the recording level to be too low than too high. Clips represent lost data, that cannot be recovered.
I import the recording onto my computer using the "CD Rip" feature of Windows Media Player, but any ripping software will do. I rip the CD as a .wav file, so that there is no data loss. Once I have the .wav file, I import it into Audacity.
The first thing I do is look at the ends of the recording. Often our sound techs will start the recording before the actual sermon starts, or the speaker will converse with the audience about something unrelated to the sermon, and which may not make sense to a listener. I will listen to the beginning of the recording to find and appropriate place to cut in.
Audacity features an easy click and drag selection tool. What I do is set the marker at 1:00 and drag back to the beginning of the recording. This does two things. When "Play" is hit, it will play the selection. Also, by hitting "Ctrl+1", I can zoom in on the selection.
Once I locate the place to begin the podcast, I mark it with the cursor, drag to the beginning and press the "Cut" button. I do the same kind of trimming at the end. I listen to the last few minutes to find a good place to end. A lot of times there is music during the invitation, so I will cut after thirty seconds or so of music. This gives me a nice bumper for the end of the podcast. (More on that later.)
Once the ends are trimmed, I begin to look at the overall levels. Sometimes there are peaks visible that indicate there are areas of very high amplitude (volume) in the signal. If there are many of them, I apply the "Leveller" effect. Select Effects => Leveller. I generally find that "Moderate" is sufficient to accomplish what I want - to equalize some of the extreme high- and low-volume areas.
If there's not a lot of peaks, I will zoom in on them and selectively use the "Amplify" effect to lower them. To do this, I move the slider on the "Amplify" dialog to the left until it's about -3.8 or so. This has little discernable effect on volume. (And we'll fix it later, anyway!) The selection tool and "Ctrl+1" are useful in this process. ("Ctrl+F" zooms the file out to fit the window.)
In the example above, you can also notice "flat lines" - areas where there are periods of silence. These may be fine in a live setting, but can get distracting when listening to audio. If I "see" a period of silence lasting more than five or six seconds, I often will trim it out. Also, sometimes the speaker engages in dialog with the audience. Since we use a wireless lavalier mic for the speaker, I would have to select and amplify that section to match the surrounding sections.
Tomorrow I will go over the rest of the process, including some more effects, and prepping for upload.


Great lesson man...im doing the same...perfecto! and boy do I wish you could be here on the 20th and 21st...bass player bailed and we are scrambling!. ha ha ha
ReplyDeleteAudacity is great - been using it few years now, and it does pretty much everything I've needed so far. With W2000 there used to be a distinct lag when recording against a backing track, but in XP there's no problem at all.
ReplyDeleteNice post - I'm editing the sermon for podcast for our Junior High group. Uturn @ Eastside Foursquare Church Bothell, WA. Have you used Compressor, Normalize, Truncate Silence or Noise Removal during the processing?
ReplyDeleteTolli, thanks for stopping by.
ReplyDeleteSince in this example we're doing spoken word, no I don't use the Compressor plugin. I do use it when recording music, however, especially electric guitar.
Normalize generally comes into play only if there is DC offset, or if I have to correct multiple tracks at the same time. In this application, that really doesn't apply, but if I combining multiple mono tracks into a single stereo track, I would use normalize. Usually here I just use Amplify.
The reason I manually pull out silences instead of using Truncate is because sometimes that silence is there for a reason - dramatic effect, if you will. So I'd rather look for them visually and then edit them appropriately than have Audacity just snip them out automatically.
Noise removal is a great tool. The problem is you need a couple of seconds of just the noise for a baseline. It's great if you have static or a hum - something like that. We generally don't, so I don't use it a lot.
Hope that helps.